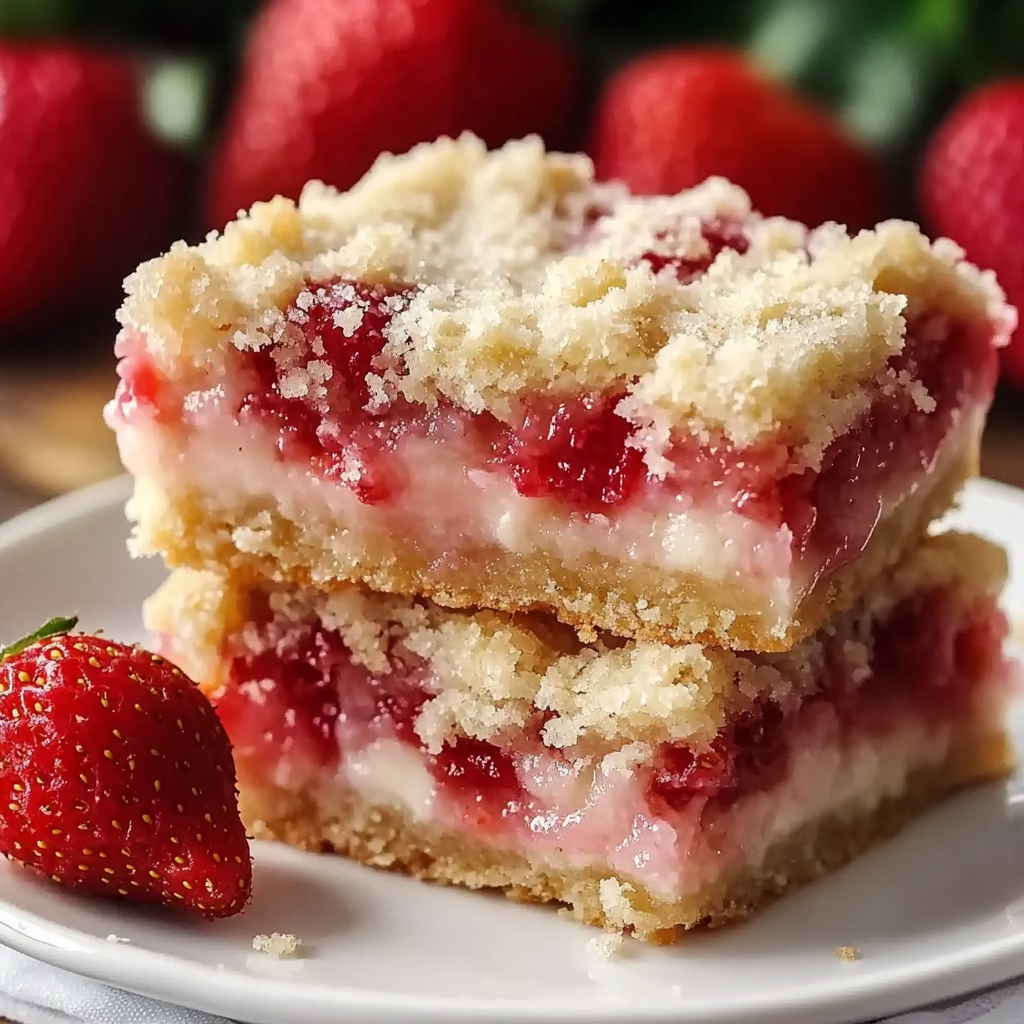
Strawberry Shortcake Bars Recipe is the absolute best way to welcome the sunshine into your kitchen without the fuss of a traditional layer cake. If you are looking for a Strawberry Shortcake Bars Recipe that tastes like a childhood memory but fits into your busy modern schedule, you have hit the jackpot. These bars combine a buttery, melt-in-your-mouth shortbread with a jammy, fresh fruit center that will make you the hero of any backyard BBQ or school bake sale. Honestly, we have all been there—trying to bake something impressive while the kids are practicing their indoor gymnastics and the dog is begging for a walk. This recipe is your secret weapon because it is simple, fast, and remarkably delicious. You do not need to be a professional pastry chef to master this; you just need a bowl, some ripe berries, and about forty minutes of your life. Trust me, once you pull these golden, glazed beauties out of the oven, you will realize why this specific recipe is a total game-changer for dessert lovers everywhere.
What is a Strawberry Shortcake Bars Recipe?
Essentially, this dish is a clever, handheld twist on the classic American dessert we all know and love. Instead of messy whipped cream and individual biscuits that go soggy in five minutes, these bars offer a sturdy yet tender crust that doubles as a crunchy topping. You get all the bright, acidic pop of fresh strawberries nestled between layers of sugary, buttery goodness. It is a portable feast that captures the spirit of summer in a square. Since we use a shortbread base rather than a sponge cake, the texture stays crisp and satisfying even after a few hours on a picnic table. It is the kind of treat that feels fancy enough for a bridal shower but is easy enough to whip up on a random Tuesday when your sweet tooth starts calling the shots.
Reasons to Try Strawberry Shortcake Bars Recipe
First of all, the flavor profile is a massive win for anyone who loves a balance of salt and sweet. Because we use salted butter in the crust, it cuts right through the sugar, making these bars incredibly addictive. You will find that these are a bargain compared to buying expensive bakery treats, and the homemade touch is simply unsurpassed. Another reason to dive in is the versatility; you can serve these chilled for a refreshing snack or warm with a scoop of vanilla bean ice cream for a decadent late-night indulgence. If you struggle with picky eaters, this is a sure-fire way to get them to eat fruit while feeling like they are getting a total prize. Plus, the cleanup is a breeze since you only need a couple of bowls, which is a blessing for any busy mom or professional trying to keep their kitchen from looking like a disaster zone.
Ingredients Needed to Make Strawberry Shortcake Bars Recipe
- All-purpose flour: 1 ¾ cups (250g) of standard pantry flour provides the perfect structure for our buttery crust and crumbly top.
- Granulated sugar: ⅓ cup (65g) for the crust plus 2 tablespoons (25g) for the filling to draw out those natural strawberry juices.
- Light brown sugar: 3 tablespoons (45g) packed to add a hint of molasses depth and extra chewiness to the shortbread.
- Salted butter: ¾ cup (170g) melted. If you only have unsalted, just add a pinch of salt to keep the flavor from falling flat.
- Pure vanilla extract: 1 teaspoon (5ml) for the dough and a little extra for the glaze to give it that authentic bakery aroma.
- Fresh strawberries: 3 cups (400g) chopped into small pieces. Use the reddest berries you can find for a stunning visual pop.
- All-purpose flour (for filling): 1 tablespoon (9g) to thicken the fruit juices so the bars don’t get soggy.
- Powdered sugar: ½ cup (60g) for a smooth, snowy white glaze.
- Heavy whipping cream: 1 tablespoon (15ml) to turn that sugar into a pourable, dreamy finish.
Instructions to Make Strawberry Shortcake Bars Recipe – Step by Step
Step 1: Prep Your Pan and Oven
Before you get your hands dirty, you need to get the logistics out of the way. Preheat your oven to 350°F (175°C) so it is nice and hot when your dough is ready. Grab an 8×8-inch square pan and line it with parchment paper. Pro tip: let the paper hang over the sides like little handles. This makes it so easy to lift the whole block of bars out later without them crumbling into a million pieces. This Step by Step preparation is the foundation of a successful bake.
Step 2: Create the Buttery Crust and Crumb
In a medium-sized bowl, whisk together your flour, granulated sugar, and brown sugar. Make sure you break up any stubborn brown sugar clumps with your fork. Pour in that glorious melted salted butter and vanilla. Stir it until it looks like wet sand, then use your fingers to toss it into chunky crumbs. This Step by Step process ensures the texture is just right. Take about two-thirds of this mixture and press it firmly into the bottom of your pan. You want a flat, even layer, so use the bottom of a measuring cup to pack it down tight.
Step 3: The First Bake
Slide that pan into the oven for 15 to 20 minutes. You are looking for a light golden color and a set texture. This par-baking Step by Step method prevents the strawberry layer from making the bottom crust mushy. While that is baking, your kitchen will start to smell like a heaven-sent shortbread factory. Once it is done, let it cool for just a few minutes on the counter.
Step 4: Prepare the Fresh Strawberry Filling
While the crust cools slightly, toss your chopped strawberries with a bit of sugar and a tablespoon of flour. This Step by Step mixing helps the flour coat every piece of fruit, which acts as a binder for the juices. Don’t let the fruit sit too long or they will get too watery. Immediately spoon the berries over your baked crust, spreading them out so every bite gets a hit of fruit.
Step 5: Add the Topping and Final Bake
Grab that remaining third of the crumb mixture you saved earlier. Sprinkle it over the top of the berries. You don’t need to cover them completely; seeing the red fruit peeking through the golden crumbs is part of the charm. Pop the pan back into the oven for another 30 to 35 minutes. You want to see the strawberry juices bubbling frantically around the edges. This Step by Step timing is crucial for that jammy center.
Step 6: The Vanilla Glaze Finish
Let the bars cool completely in the pan—seriously, don’t rush this or the glaze will just disappear. Once they are cool, whisk your powdered sugar, cream, and vanilla until smooth. Drizzle it over the top in whatever pattern makes your heart happy. Finally, lift them out using your parchment handles, slice into 12 generous squares, and watch them vanish. This final Step by Step touch makes the bars look truly professional.
What to Serve with Strawberry Shortcake Bars Recipe
If you want to go the extra mile, a dollop of homemade whipped cream on the side is a classic choice that never fails. For a summer brunch, these bars pair beautifully with a cold glass of moscato or a tart lemonade to balance the sweetness. If you are serving these as a mid-afternoon snack for the kids, a tall glass of cold milk is the ultimate companion. You could even get a little wild and serve them alongside some fresh blueberries and blackberries for a “triple berry” dessert platter that looks like it belongs in a magazine.
Key Tips for Making Strawberry Shortcake Bars Recipe
The biggest secret to success is the quality of your strawberries. If they are out of season and tastes like crunchy water, your bars will reflect that. Look for berries that are deep red all the way to the stem. Also, don’t be afraid to really press that bottom crust down hard; you want a solid base so you can eat these with your hands without them falling apart. If you find your glaze is too thick, add just a tiny drop more cream until it reaches a drizzling consistency. It is a simple fix that makes a massive difference in the final look.
Storage and Reheating Tips Strawberry Shortcake Bars Recipe
You can keep these bars in an airtight container at room temperature for a day, but for the best results, put them in the fridge. They will stay fresh and delicious for up to three days when chilled. If you prefer a warm dessert, just pop a bar in the microwave for about ten seconds to soften the shortbread and wake up those strawberry flavors. Just be careful not to overheat them, or your beautiful glaze will turn into a puddle! These are also great straight from the fridge if you like a firmer, cold treat on a hot day.
FAQs
Can I use frozen strawberries? You can, but make sure to thaw them and pat them very dry first. Frozen berries hold more moisture, so you might need an extra teaspoon of flour in the filling to prevent a soggy bottom.
Can I make these gluten-free? Absolutely. Just swap the all-purpose flour for a high-quality gluten-free 1-to-1 baking blend. The texture might be slightly more delicate, so let them cool completely before slicing.
Do I have to use a glaze? Not at all! The bars are plenty sweet on their own. However, the glaze adds that “wow” factor and a bit of extra creamy sweetness that really rounds out the dish.
Final Thoughts
Wrapping things up, this Strawberry Shortcake Bars Recipe is a magnificent addition to your baking repertoire that offers a huge reward for very little effort. Whether you are dealing with a hectic work week or planning the perfect weekend gathering, these bars provide a reliable, sensational treat that everyone will love. The combination of the buttery crust and the explosive fruit filling is a miracle of simple ingredients coming together. Don’t wait for a special occasion to try this; make today the day you treat yourself to something wonderful. You deserve a kitchen filled with the scent of baking berries and a plate full of golden happiness. This Strawberry Shortcake Bars Recipe is truly the ultimate summer win.